Accounts Receivable - Deposits
Overview
The Deposits screens can be used to perform the following tasks:
- Record payments made to bank accounts (can consist of both the deposit of Customer Payments originally made to an Undeposited Funds bank account and the deposit of Miscellaneous Deposit items).
- Record miscellaneous charges made to bank accounts (as negative deposits).
- Edit unposted Deposits
- View the details of previously posted Deposits
After posting, the Deposit can be voided, which reverses out the effects of the Deposit in the general ledger and makes any Customer Payments included in the Deposit available for selection in another Deposit.
Deposits can have one of the following statuses: INUSE, SUBMITTED, or POSTED.
Roles
This screen is available to users having any of the following roles: Administrator, AR User, AR Poster, or AR Viewer.
- Users having the AR User role are authorized to create, edit, view and submit Deposits (limited by Organization Access restrictions).
- Users having the AR Poster role are authorized to post and void Deposits (limited by Organization Access restrictions). Deposits can be posted directly from the Deposits List for those entries having a status of SUBMITTED, or individual Deposits can be posted directly from the Deposit screen using the Post/Next button.
- Users having the AR Viewer role are authorized to view Customer Payments (limited by Organization Access restrictions).
License
This screen is available with the Project Financials family of Unanet licenses.
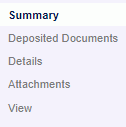
Topics covered on this help page include:
-
Search (to refine the list of Deposits)
-
List (to view, edit, delete, void or post Deposits)
-
Add (to add Deposits)
-
Edit
-
-
View (to see a view only copy of a Deposit)
-
Post (to post Deposits)
-
Void (to void Deposits)
-
Closed Fiscal Year (adjusting entries when posting/voiding to a closed fiscal year)
You may also be interested in:
Search
Using the Deposit Search screen, you can refine the list of Deposits with which you have interest, by supplying search criteria and clicking on the List tab. The default selection criteria is configured to return all INUSE Deposits for the current month.
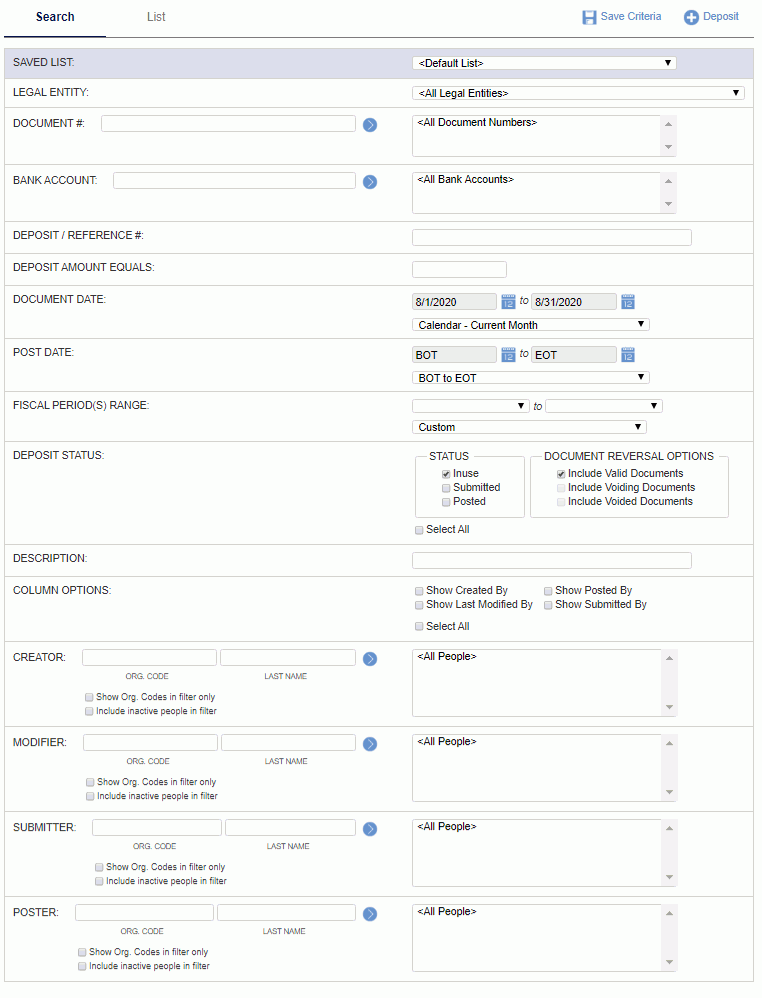
Field Descriptions (click on a link below for additional information):
List
The entries included in the resulting List screen will contain any items matching the supplied search criteria. For those items in the SUBMITTED status, a leading checkbox is available which can be used to initiate a bulk Post action directly from this screen by clicking the Post button. A number of additional are available to facilitate a variety of activities.
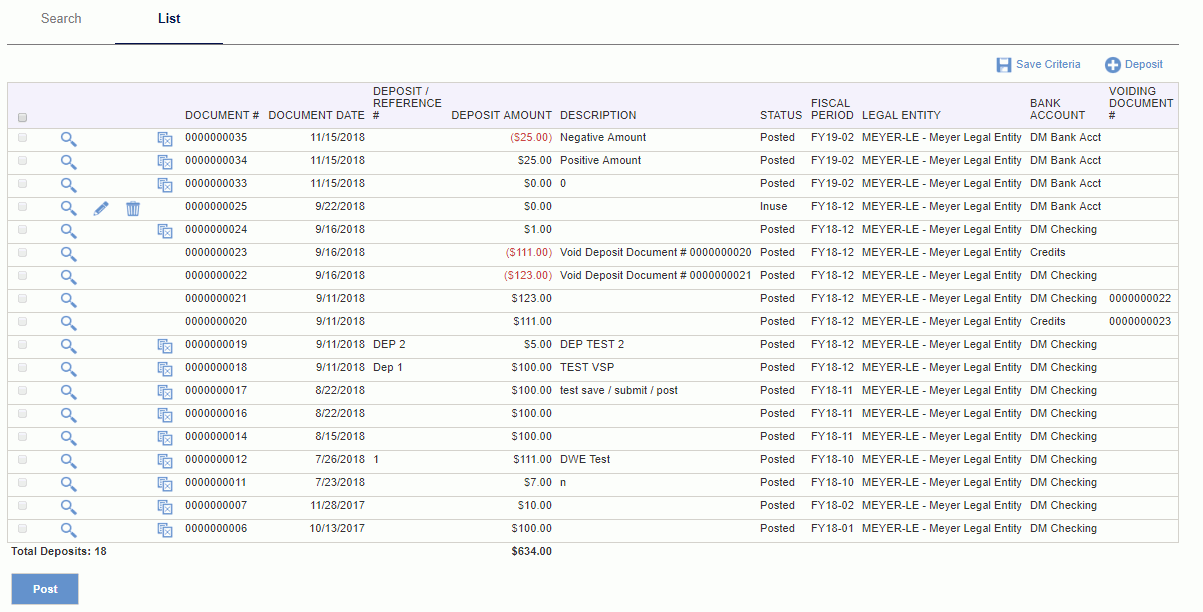
Note that entries associated with Customer Organizations that do not have a specified Remit To Organization Address will be flagged in this listing.
Field Descriptions (click on a link below for additional information):
|
|
-
(To save criteria, add, view, edit, delete, void, know attachments exist; or post one to many submitted Deposits.)
-
-
-
-
-
-
-
-
-
-
-
-
-
-
|
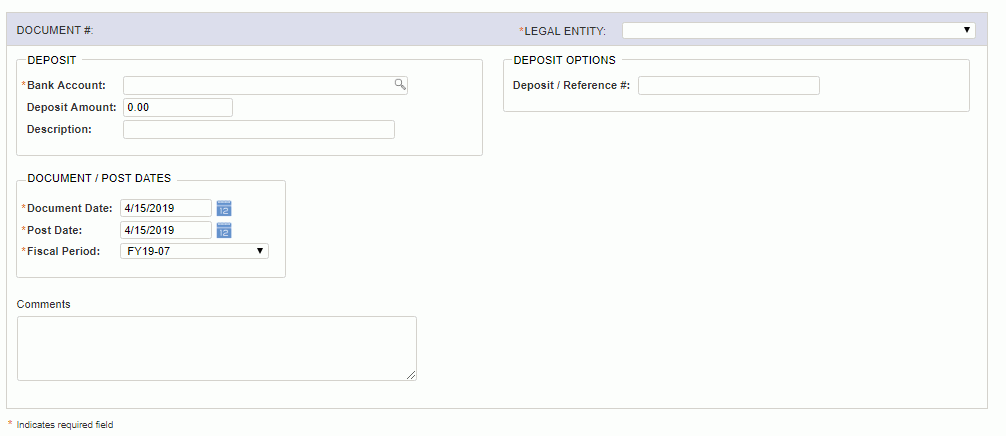
Add Deposit
Clicking on the  link (available on the Deposit - Search/List screens), will present you with the Deposit - Summary screen where you will supply the summary information for a Deposit. Subsequent to providing the summary level information, you will likely want to navigate to the Deposited Documents and/or Details options, to indicate to which Customer Payments a deposit is addressing (via Deposited Documents screen) and/or directly enter transactions where no Customer Payment was sent (via Detail screen).
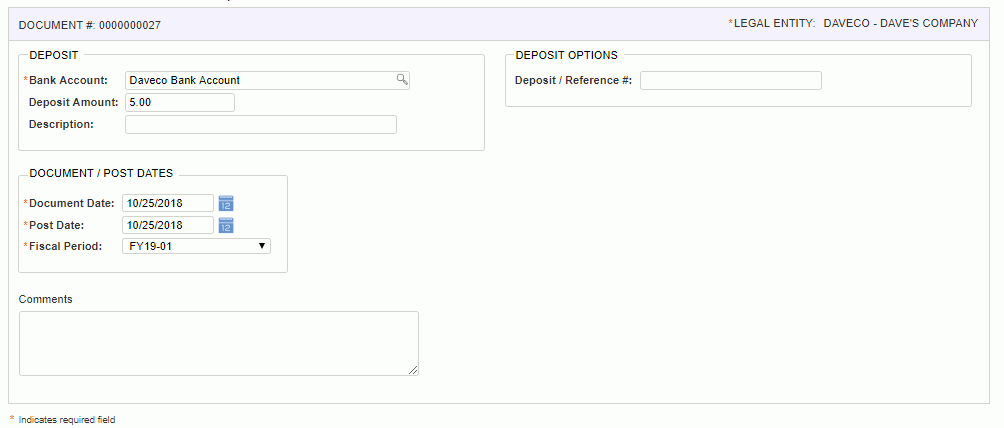
On this Summary screen, you will enter information regarding the Bank to which you are making a deposit, the deposit amount, the document and post dates, any comments you'd like to associate with the entry and more.
Field Descriptions (click on a link below for additional information):
|
|
-
-
-
Deposit
-
-
Document / Post Dates
-
-
-
|
Edit Deposit - Summary
The Edit Deposit screen (which you can get to by navigating to the Summary left menu option after clicking the pencil icon from the Deposit list screen), is nearly identical to the Deposit Add screen. On this screen you can modify most fields with the exception of Legal Entity (which can no longer be modified once any Deposited Documents or Details line items have been added to this Deposit). This screen also displays the Deposit Document # assigned to this Deposit.
The Summary menu option will become unavailable once the Deposit reaches the POSTED status.
Field Descriptions (click on a link below for additional information):
|
|
-
-
-
Deposit
-
-
Document / Post Dates
-
-
-
|
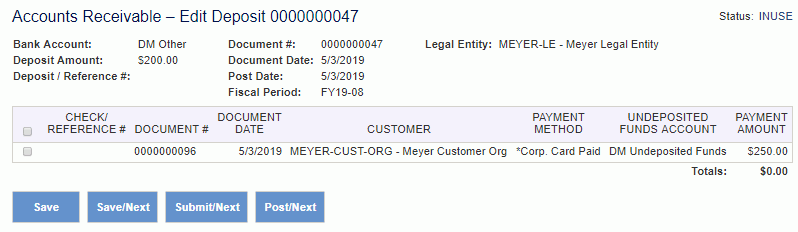
Edit Deposit - Deposited Documents
This screen will display a list of previously included and potentially includable Customer Payment documents which may be associated with the current Deposit. From this list you can choose which Customer Payments this deposit will cover.
You can navigate to the Deposited Documents screen via the left menu option (once editing a Deposit) or directly by clicking the edit pencil icon from the Deposit list screen.
The Deposited Documents menu option will become unavailable once the Deposit reaches the POSTED status.
Header
The information in the 'header' section of the screen will recap the information provided on the document Summary.
Deposited Documents Grid
To indicate that a particular Customer Payment is to be included in this Deposit document, you must click on the checkbox in the leading column of a desired row (or the checkbox at the top of that column which will toggle all rows on and off). Once you have checked the leading checkbox, the column Payment Amount total will be dynamically updated. When selecting a Customer Payment to include, you have no ability to edit or modify any of the attributes.
This grid will include Customer Payment entries in the following order:
- Documents that have been previously included (and saved) in this Deposit will be listed first.
- Documents that are potentially includable will be listed next.
Within these groupings, documents are additionally ordered by Document # descending.
Potentially includable documents are:
- Customer Payments that have not already been associated with any other Deposit document.
- Customer Payments having a Bank Account Type of Undeposited Funds.
- Customer Payments having a Bank Account belonging to the same Legal Entity as that of the current Deposit document.
- Posted Customer Payments that are not Voided or Voiding documents.
Submit/Post Validations
Noteworthy validations that occur at the time of submittal or posting, include:
- The sum of the amounts applied in the Deposited Documents and Details grids must exactly match the Summary -- Deposited Amount value.
For a more complete listing of validations, see the button description.
Field Descriptions (click on a link below for additional information):
Buttons (click on a link below for additional information):
Edit Deposit - Details
This screen is available to enter the detail line items making up a Deposit (which you can get to by navigating to the Details left menu option after clicking the pencil icon from the Deposit list screen). The entries on this screen represent transactions where no Customer Payment has been entered into Unanet and the accounting distribution must be entered along with the deposit.
The Detail menu option will become unavailable once the Deposit reaches the POSTED status.
Header
The information in the 'header' section of the screen will recap the information provided on the document Summary.
Details Grid
This section of the Deposit Details screen is where you will be entering the individual line items that make up the Deposit.
For those Accounts that have been designated as requiring Project information (configured on the Admin >> Setup >> Accounts screen with the Require Project indicator checked), you can also provide additional 'reference' information (such as the project, task, project type, expense type, person and possibly a Customer or Vendor organization).

Field Descriptions (click on a link below for additional information):
Buttons (click on a link below for additional information):
Deposit Attachments
This screen is available to attach one or more documents to a Deposit (which you can get to by navigating to the Attachments left menu option after clicking the pencil icon from the Deposit list screen).
Users can add attachments regardless of the Deposit status. Only Administrators can delete attachments when the Deposit status is Posted.
Note: The Unanet Administrator may want to suggest guidelines with regards to what types of files may be acceptable to be used as Deposit attachments, particularly in the case where any documents are being scanned and saved as a graphics file. Certain graphics file formats are known to result in much larger files sizes than others and you may want to consider suggesting a specific file type to help control the amount of data being stored in your database. Generally speaking, jpg and gif files tend to be much smaller than tif and png file formats.
To assist with the management of allowable attachment types and size, the administrator can use the following three properties: Maximum Size Allowed for each attachment (unanet.attachment.max_size), File Extensions that are Not Allowed (unanet.attachment.invalid_file_extensions) and File Extensions that are allowed (unanet.attachment.valid_file_extensions).
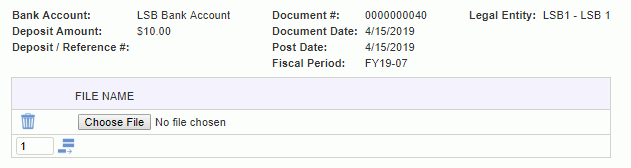
Using this screen, the user can add, remove or view an attachment. The Save button will save the changes to the attachment screen and return the user to the Deposit Details screen. The Cancel button will also navigate the user to the Deposit Details screen but without saving any changes. Clicking on the paper clip icon will launch a new window and attempt to display the attachment (assuming your local PC knows what application to execute to view the specific file type).
Field Descriptions (click on a link below for additional information):
Where can attachments be seen?
The Deposit >> List screen will contain a paperclip ( ) icon to indicate attachments exist on a particular Deposit. Clicking on the icon will navigate the user to the Deposit >> View screen with the Attachment section expanded.
When viewing a Deposit that has attachments, the list of attachments will appear in an expandable table under the displayed Deposit details as in the example below. You can click on the paper clip icon ( ) and view the attached document (assuming you have the necessary local software installed to view the particular file type). This section will only appear if attachments exist.

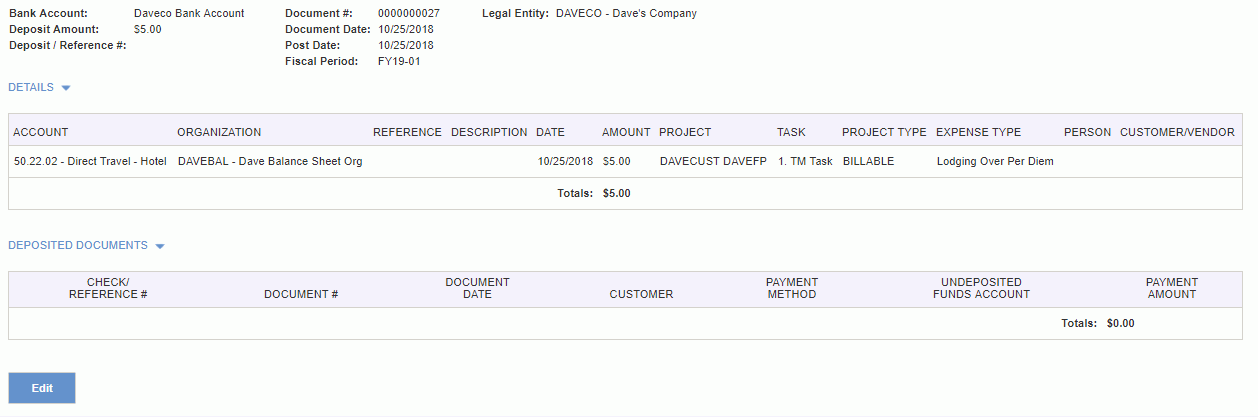
View Deposit
This screen is available to view a read-only version of the Deposit document (which you can get to by navigating to the View left menu option after clicking the pencil icon from the Deposit list screen or by clicking on the view icon on the Deposit >> List).
Once the Deposit reaches the POSTED status, this will be the only available menu option.
An Edit button will appear at the bottom of this screen if all of the following conditions are met:
- The user viewing the Deposit has access to this Deposit's Legal Entity
- The status is anything other than Posted
If the Deposit had been in a status of SUBMITTED, then clicking on the Edit button will return the status to INUSE.
Post Deposit
Roles
This screen is available to users having any of the following roles: Administrator or AR Poster. Note that AR Posters are limited to posting Deposits for the Legal Entities they have access to via Financial Organization Access.
Deposits can be posted from two screens:
- Individual Deposit Post -- When editing the Details or Deposited Documents grid for a Deposit, the current Deposit can be posted by clicking the Post/Next button. Deposits in the INUSE or SUBMITTED status may be posted from this screen.
- Bulk Deposit Post -- When listing one or many Deposits on the Deposit >> List screen, the user can check one or many Deposits and click on the Post button to invoke a post for many Deposits. Only those Deposits in the SUBMITTED status can be included in a bulk post.
The posting process includes the following (not necessarily generated in this order):
- Create General Ledger Entries -- GL entries are only generated when posting to the General Ledger (i.e. Post to General Ledger (unanet.financials.post_to_gl) property enabled and the Post to General Ledger Effective Date (unanet.financials.post_to_gl.eff_date) <= document post date).
Attributes for the general ledger entry will include (for the individual entries, those attributes that are different than the general entry will be noted):
-
- Feature - DEPOSIT
- Document Number - Current document's document number
- Post Date - Current document's post date
- Fiscal Month - Fiscal month containing post date of current document
- Account - Described below
- Organization - Described below
- Project - Optional, relevant to Detail grid entries.
- Description - Current document's description (exception - Detail entry uses detail documents description)
- Transaction Date - Current document's document date (exception - Detail entry uses detail documents document date)
- Summary -- Create general ledger record for the deposit amount from the Summary (zero is allowed).
-
- The Summary amount acts as an off-setting value to the Detail amounts.
- The GL amount recorded will be the value of the Deposit Amount field on the Summary record.
- The Org and Account used will be taken from the Bank Account on the Summary record.
- A positive amount will be recorded as a Debit amount.
- A negative amount will be recorded as a Credit amount.
- Deposited Documents -- Create general ledger records for the non-zero rows in the Deposited (Customer Payment) Documents grid.
-
- The GL amount recorded will be the value of the Payment Amount.
- The Org and Account used will be taken from the deposited Customer Payment (originally derived from the Bank Account associated with the payment).
- A positive amount will be recorded as a Credit amount.
- A negative amount will be recorded as a Debit amount.
- Detail -- Create general ledger records for the non-zero rows in the Detail grid.
-
- The GL amount recorded will be the value of the Amount field.
- The Org and Account used will be taken directly from the Detail record.
- A positive amount will be recorded as a Credit amount.
- A negative amount will be recorded as a Debit amount.
- Create Project Expense Entries -- Project expense entries are only generated when the document has non-zero Detail rows that include project info. For each of those rows, we will create project expense records (to be available for subsequent Billing Post & Invoicing activities).
- The expense amount recorded will be based on the Detail's Amount as follows:
-
- A positive amount will be recorded as a negative expense amount.
- A negative amount will be recorded as a positive expense amount.
- Alternatively explained, the project expense entry is based on the associated GL entry calculated as debit - credit.
Validations
While you can save a financial document violating certain rules, you will not be permitted to submit or post the document until they are resolved. If any of the validations fail for any row on the document, the entire document cannot be posted.
- Standard financial document validations:
-
- Only System Administrators can post into closed Fiscal Periods / Years
- When posting a recurring document and the document is not the last in the series, the post process will attempt to automatically create the next occurrence into the next fiscal period. The post will be prevented if the next fiscal period does not exist
- Standard financial document validations for Summary level information:
- Legal Entity must be a financial organization
- Legal Entity must still be defined as Legal Entity at time of posting
Standard financial document validations for each Detail row:
- The row's Account must be active
- Transaction Entry must be allowed for the Account
- Document's Post Date must be within the allowed transaction date range for Account
- Account must still be valid for the Organization
- Organization must be active
- Organization must belong to this document's Legal Entity
- Transaction entry must be allowed for Organization
- Document's Post Date must be within the allowed transaction date range for Organization
- Project must be provided if Account requires project
- Project must not be provided if Account does not require project
- Project provided must be active
- Project's Owning Organization must belong to this document's Legal Entity
- Task must be provided if project is defined as "requires tasks for expense reporting"
- Task provided must be active
- When Project provided, Project Type must be provided
- When Project provided, Expense Type must be provided
- Expense Type must be valid for the Account
- Expense Type must be valid for the project
- Item must be valid for the project
- Additional Submit/Post time validations:
-
- The sum of the amounts applied in the Deposited Documents and Details grids must exactly match the Summary -- Deposit Amount value.
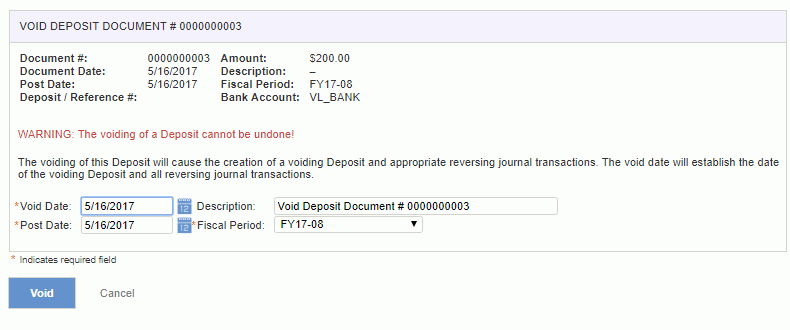
Void Deposit
Roles
This screen is available to users having any of the following roles: Administrator and AR Poster.
Clicking on the Void icon ( ) in the Deposit List will allow you to void a POSTED Deposit (generating a negating / voiding Deposit). This action does not delete any entries nor will it recalculate any values, but rather creates a set of reversing entries based on the original transactions. This is true even if attributes referenced in the original documents have subsequently been made inactive, the voided transaction will continue to use those attributes to reflect the reversing values.
The posting process includes the following:
- Create a "Voiding" Deposit -- Clone the document being voided. The voiding document will be identical to the original document with the following differences:
-
- All amounts (i.e. Summary deposit amount, Deposited Document amounts, and all Detail grid row amounts) are reversed (ie have opposite signs) on the clone.
- Document Date will reflect the Void Date supplied on this screen (Detail line item dates will be the same as they were on the original document).
- Description will reflect the value supplied on this screen.
- Post Date and Fiscal Period will reflect the values supplied on this screen.
- The Transaction Date for the reversing document's details should be the original line item date.
- Create "Reversing" General Ledger Entries -- Reversing GL entries are only generated when posting to the General Ledger (ie Post to General Ledger (unanet.financials.post_to_gl) property enabled and the Post to General Ledger Effective Date (unanet.financials.post_to_gl.eff_date) <= document post date):
- GL transactions will be generated regardless of whether the posting of the original document resulted in GL transactions.
- Summary -- Create reversing general ledger record for the non-zero deposit amount from the Summary
-
- The GL amount recorded will be the value of the Deposit Amount field on the Summary record negated.
- The Org and Account from the original Summary will be used without any validations.
- A positive amount will be recorded as a Debit amount.
- A negative amount will be recorded as a Credit amount.
- Deposited Documents -- Create reversing general ledger records for the non-zero rows in the Deposited (Customer Payment) Documents grid.
-
- The GL amount recorded will be the value of the Payment Amount negated.
- The Org and Account from the original Deposited Document will be used without any validations.
- A positive amount will be recorded as a Credit amount.
- A negative amount will be recorded as a Debit amount.
- Detail -- Create reversing general ledger records for the non-zero rows in the Detail grid.
-
- The GL amount recorded will be the value of the Amount field negated.
- The Org and Account from the original Detail will be used without any validations.
- A positive amount will be recorded as a Credit amount.
- A negative amount will be recorded as a Debit amount.
- Create "Reversing" Project Expense Entries -- Reversing project expense entries are only generated when the document being voided has non-zero Detail rows that include project info. The void process will create reversing project expense transactions that differ form the original transaction only in the sign of the amounts.
Validations
- Once you void a document, you cannot 'undo' the void.
- Only POSTED entries can be voided (ie INUSE and SUBMITTED items can be further modified, thus no need to void them).
- You can only void an 'original' document that has not previously been voided.
- You cannot void a voiding document.
- Voiding a document will not void any of the included Deposited Documents but simply void the relationship with the voided Deposit.
To void a Deposit, you will need to supply values for the following fields and click on the Void button.
Field Descriptions (click on a link below for additional information):
Closed Fiscal Years
Posting to Closed Fiscal Year
When posting to or voiding a document from a closed fiscal year, and the document contains details for accounts having account types REVENUE and EXPENSE, where the credits and debits do not cancel each other out (i.e. the delta between the revenues and expenses is not = 0), this process will additionally need to generate an adjustment to the previously recorded RETAINED EARNINGS account for the closed year.
Note the adjustment will be generated regardless of the existence of the RETAINED EARNINGS account for the year being adjusted.
The adjusting transaction will have the following attributes:
- Feature - GL Closing
- Document Number - Document number of the document that caused the adjustment
- Post Date - The last day of the fiscal year being adjusted
- Fiscal Month - Fiscal month containing post date of the adjusting document
- Reference - Posting feature of the document that caused the adjustment
- Account - Derived based on the RETAINED EARNINGS category entry in the System Default Posting Group
- Organization - Derived based on the RETAINED EARNINGS account category entry in the System Default Posting Group
- Description - Fiscal Year {adjusted fiscal year value} Closing Entry
- Transaction Date - The last day of the fiscal year being adjusted
- Credit & Debit - As calculated based on the delta between the revenues and expenses included in the document that caused the adjustment. Positive delta should be recorded as a credit, and negative amount as a debit.