|
|
|
|
The expense report is the primary vehicle available for the collection of expense entries.
Topics covered on this help page include:
Expense Validations (validation processes)
Previewing Expenses (for a standard printable view of expenses)
Allocation View of an Expense Report (preview version showing project allocation splits)
Purchase Order Assignments (mapping expense lines to Purchase Orders)
Expense Requests (request authorization for an expense)
You may also be interested in:
Listing Active and Completed Expenses (Expense >> List menu option)
My Projects (user screen used to help manage which Projects and Tasks will appear in the expense report drop-downs)
Missing Project/Task (if you are having difficulty understanding why a particular project / task is not appearing on a user's expense report)
Payment Methods (manage list of Payment Methods allowed on expense reports)
Printing Tips (a few browser suggestions for improving printed output)
Transferring Imported Credit Card Expenses (property driven feature allowing a user to include imported credit card transactions on an expense report)
Expense Statuses (review the sequence of statuses an expense report progresses through)
AutoLock (property driven feature allowing COMPLETED expense reports to immediately graduate to a LOCKED status)
Reclaim Tax (optional feature to enable additional fields to capture Value Added Tax information)
Expense Wizards (for more information about the built-in Wizards for various expense types)
Importing Expenses (for more information about importing expenses via the Expense Import feature)
Purchase Order Assignments (mapping expense reports to a Purchase Order for subcontractors)
Expense Report Process Flow (search for these topics in the Knowledge Center)
FAQ - Can I prevent a user from submitting an expense with the wrong project type or payment method?
Quick Topic - How do I correct, negate, or delete an expense amount?
Quick Topic - Voiding a Locked or Extracted Expense Report
FAQ - How do I configure my Unanet to require Project Approvers to approve time/expense prior to HR Managers/supervisors?
FAQ - Can I set up a person to only approve expense reports and not expense requests?
Quick Topic - Capturing subcontractor hours and expenses in Unanet for non-Financials customers
FAQ - Why doesn't a project appear in my expense report?
Quick Topic - Mobile Enabled Expense Reporting
Quick Topic - End-User Expense Training
To initiate the creation of a new expense report, simply click on the (![]() ) expense add icon. This icon is available on a number of dashboards as well as on the Expense >> List screen. Clicking on this icon will present the user with a new expense report Purpose screen.
) expense add icon. This icon is available on a number of dashboards as well as on the Expense >> List screen. Clicking on this icon will present the user with a new expense report Purpose screen.
If the Require Email Address to Submit Expense Reports (unasense.email.required) property is being used, users will not be allowed to create and submit an expense report without having an email address specified in their user profile.
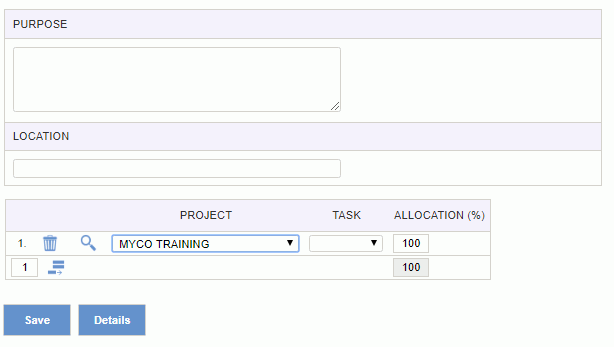
There are two main screens associated with the creation of an expense report. The Purpose screen and the Details screen (there may be other popup wizards as well). Displayed below is an example expense report Purpose screen.
|
|
|
Which Projects/Task are Available
The projects and tasks that appear in your expense report will be those projects / tasks to which you have been assigned. End users can further control which assigned projects/tasks will appear in their expense report drop-down lists via the My Projects screen. If you are having difficulty understanding why a particular project / task is not appearing on a user's expense report, check out the Missing Project/Task section on the My Project's help page.
In addition, if the project is managed at the task level, then only tasks that allow Expense Reporting will be included.
If the project is managed at the project level, and the project requires tasks for Expense Reporting, then only projects with at least one task that allows Expense Reporting will be included.
If the project is managed at the project level, and the project does not require tasks for Expense Reporting, then only projects that allow Expense Reporting at the project level or have at least one task that allows Expense Reporting will be included.
Note: Users can charge expenses to projects and tasks outside of their legal entity (see Multi-Entity) if they are assigned as a loaned intercompany resource (see new assignments page Intercompany Support).
Legal Entity / Financial Org Restrictions
When the Use Financial Organizations (unanet.financials.use_financial_orgs) property is enabled, the list of projects will be further constrained. For users having a classification of salaried or hourly (as of today), allow only those projects having an Owning Organization that has the same Legal Entity as the current user's Person Organization's Legal Entity. This restriction will be enforced on expense report save and submit. Further, it will only apply to line items having a line item date >= any value set in the Use Financial Organizations Effective Date (unanet.financials.use_financial_orgs.eff_date) property.
Submit validations will also ensure that projects have an Owning Org (which is a Financial Org) and that it has the appropriate Legal Entity (same as the user's Person Org Legal Entity). If a Task is being charged to and it has an Owning Org specified, it to will have the same Owning Org validations performed.
Note: Projects outside of the users legal entity will show up if that user is assigned as a loaned intercompany resource on the project outside of their legal entity.
If the Show Project Org Code on Expense Report Edit (unasense.expense.org.display) property is being used, the Project Organization code may be suppressed in your editable and preview expense reports / requests.
Likewise, if the Show Project Title on Expense Reports (unasense.project.title.display) property is being used, you may see the Project Title concatenated onto the Project Code in your editable and preview expense reports / requests.
|
|
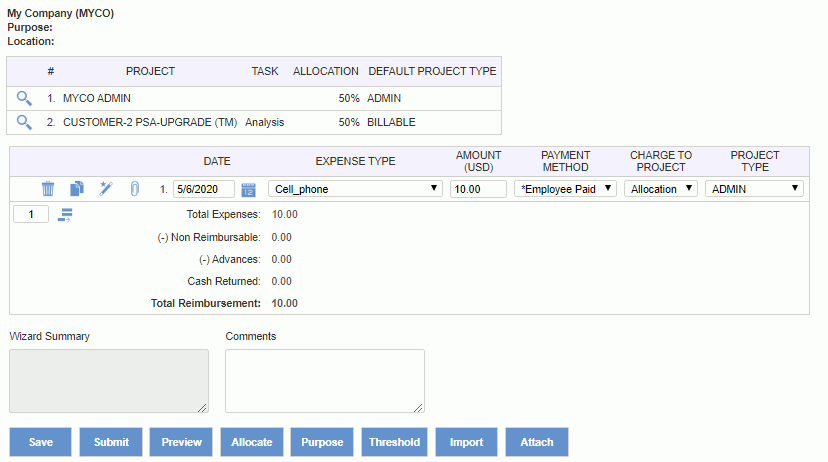
The details screen is the main vehicle for entering expense line items. You can navigate to this screen from the Purpose screen when adding a new expense report or you will directly access this screen whenever editing an existing expense report.
|
|
|
If the Show Project Org Code on Expense Report Edit (unasense.expense.org.display) property is being used, the Project Organization code may be suppressed in your editable and preview timesheets.
Likewise, if the Show Project Title on Expense Reports (unasense.project.title.display) property is being used, you may see the Project Title concatenated onto the Project Code in you timesheet and preview timesheet.
An additional total "Total Overage" will appear in the expense report preview only when there are expenses of type LODGING_ALLOWABLE or MIE_ALLOWABLE. It will reflect the sum of all the numbers displayed in the Total Overage field of the wizard itself. MIE Per Diem and Lodging Per Diem overages are not included in this total.
|
|
|
Built-in Validations
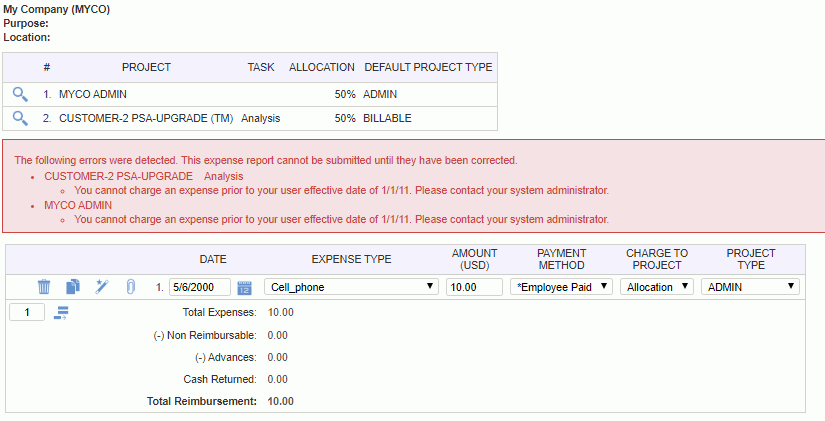
When you save an expense report, you may encounter two general types of errors/warnings. First, those errors that prevent the saving of your expense report (e.g. you've entered an invalid character in a numeric field), and secondly, entries that are syntactically correct, but may violate an assignment or some other rule. In the latter case, the expense report will save successfully, however, you will see the error messages displayed across the top of the screen. Expense report submittal will not be allowed if theses types of errors exist.
Common built-in validations include:
Below is an example of this type of error message.
Account Validation
If the Post to General Ledger (unanet.financials.post_to_gl) property is enabled, the system will additionally validate that an Expense Report Cost Account can be derived for each line item. Should the Post to General Ledger Effective Date (unanet.financials.post_to_gl.eff_date) property be set, only those line items having a line item date on or after this Effective Date will be subjected to this verification. See Posting Groups >> Expense Report Cost Account Logic for account defaulting details.
Custom Validations
In addition to the business rules defined by setting project profile options, assignment date ranges, etc. you can also create additional customized validations using the Expense Stored Procedure feature.
In addition to the editable version of the expense report, users can also view a non-editable preview version. This version may be more suitable for purposes of creating a printed copy (also see the Print Friendly icon).
Which sections are collapsed upon initial display of the expense report preview can also be configured by your administrator via the various User View Default (unasense.preview.expand) properties. If you desire to review the details in these sections, you can expand or collapse these sections using the or (![]() or
or ![]() ) controls.
) controls.
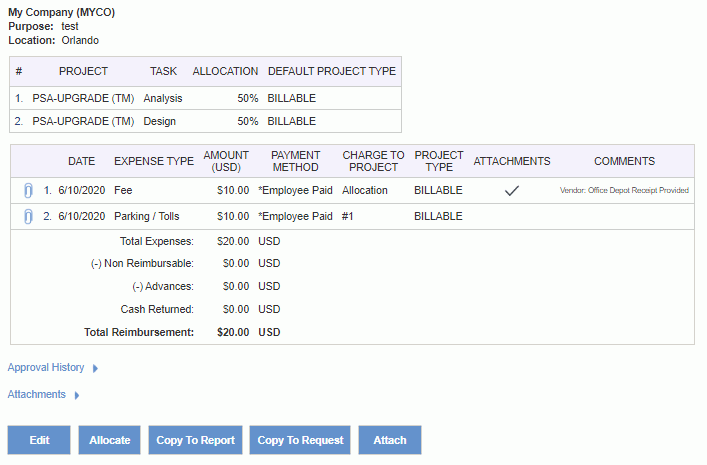
The Charge to Project column will either display "Allocation", which indicates the charge is allocated to multiple projects, or will display the number of the project which is charged.
The Attachments column will be checked if the line has attachments.
If the Show Project Org Code on Expense Report Edit (unasense.expense.org.display) property is being used, the Project Organization code will be suppressed in your editable and preview expense reports.
Note that whether the list of Approval History section is available for viewing by users having the customer role during approvals is controlled via the Allows Customers to View Expense Report Approval History (unasense.customer.view_approval_history) property.
If an expense report has more than one project identified on the Project Allocation portion of the Purpose screen, then an additional Allocate button will be visible on the expense preview. Clicking on this button will present an alternative preview version detailing the allocated amounts. An example allocation preview follows:
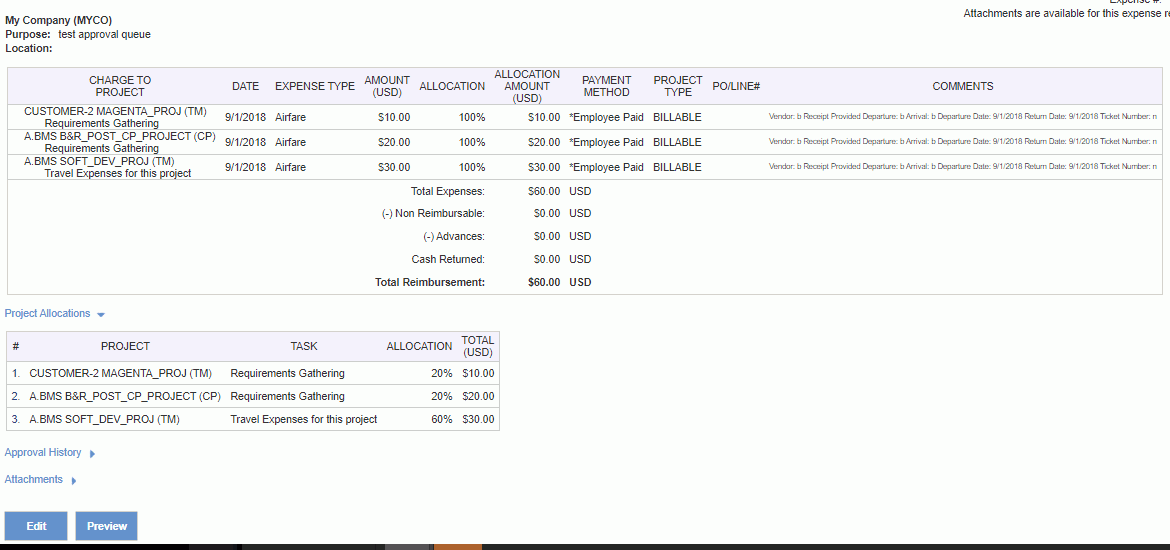
If the project requires a Non-Employee (PO) to use a PO (see Project Profile >> Expense tab) and the Payment Method is "Employee Paid", the PO/Line # field will be populated for user's classified as Non-Employee (PO) on the date of the expense report detail line. Each expense report line for a Non-Employee (PO) is mapped to an Open Purchase Order based on project, expense type, and date. See Purchase Order Assignments for more information.
If the account defined for a PO Line is different from the account on the Expense Report detail line, the account from the PO Line is Posted to the General Ledger.
Expense users can view the current thresholds of each expense type (as defined by the Unanet Administrator via the Admin >> Setup Expense Types screen). By pressing the Threshold button on the expense report details screen, users will see a window pop up similar to the one shown below:
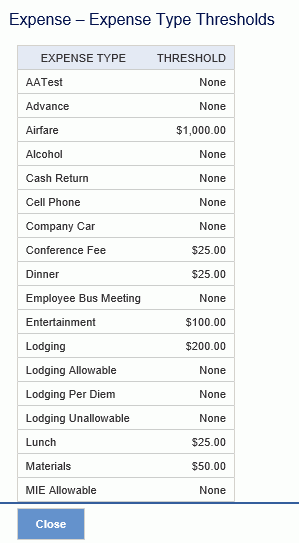
If a threshold is exceeded for an expense type (on any particular line item), you will see a warning icon (![]() ) next to that detail line.
) next to that detail line.
Expense Requests are very similar to Expense Reports. The purpose of an expense request is to request authorization for an expenditure. The process of creating and submitting an expense request is nearly identical to that of creating an expense report.
To initiate the creation of a new expense request, simply click on the (![]() ) expense request add icon. This icon is available on a number of dashboards as well as on the Expense >> List screen. Clicking on this icon will present the user with a new expense request Purpose screen (you'll notice a background watermark to remind you that this is a request rather than a report).
) expense request add icon. This icon is available on a number of dashboards as well as on the Expense >> List screen. Clicking on this icon will present the user with a new expense request Purpose screen (you'll notice a background watermark to remind you that this is a request rather than a report).
Once a Request has been submitted and approved, that Request becomes an active Expense Report for that user. The expense report can then be further modified and submitted at a later time. The original approved expense request remains available for viewing (in it's unaltered state).
Expense Requests have slightly different statuses than Expense reports. Check out the statuses help page for more information.
When editing an Expense Report or Expense Request, users have the ability to attach documents. This feature may be useful for example if your policy requires you to attach an electronic copy of an expense receipt to each expense report, but may also be used to attach any type of document (e.g., perhaps this is a request for an equipment purchase and you may desire to attach the equipment specifications).
For Expense Reports, if the detail lines have an expense type that requires a receipt (see Admin >> Setup Expense Type), then the detail line must have at least one attachment (see Line Level Attachments), or a reason for not including attachments must be provided. If you include an attachment for these expense types, then the Receipt Provided box will be automatically checked. Conversely, if you remove all attachments for that line, the box will be unchecked. System Administrators can submit without a receipt, even if one is required.
For Expense Reports, users can add attachments regardless of the status. Users (including administrators) can delete attachments only when the Expense Report is in INUSE status, or if the attachment has not yet been saved on the expense report.
For Expense Requests, users can add attachments if the request is in DENIED or REQUESTING status.
Note: The Unanet Administrator may want to suggest guidelines with regards to what types of files may be acceptable to be used as expense attachments, particularly in the case where receipts are being scanned and saved as a graphics file. Certain graphics file formats are known to result in much larger files sizes than others and you may want to consider suggesting a specific file type to help control the amount of data being stored in your database. Generally speaking, jpg and gif files tend to be much smaller than tif and png file formats.
To assist with the management of allowable attachment types and size, the administrator can use the following three properties: Maximum Size Allowed for each attachment (unanet.attachment.max_size), File Extensions that are Not Allowed (unanet.attachment.invalid_file_extensions) and File Extensions that are allowed (unanet.attachment.valid_file_extensions).
While in edit mode, clicking on the Attach button will launch the following Attachment screen. You can also click on the attach icon -  - on any item line.

Using this screen, the user can add, remove or view an attachment. The Save button will save the changes to the attachment screen and return the user to the Expense Report Edit screen. The Cancel button will also navigate the user to the Expense Report Edit screen but without saving any changes. Clicking on the paper clip icon will launch a new window and attempt to display the attachment (assuming your local PC knows what application to execute to view the specific file type).
|
|
If you click on the attachment icon next to a line, you will see the Manage Expense Report Attachments screen:
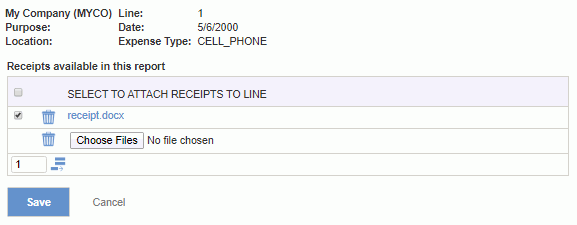
Using this screen, the user can add, remove or view an attachment. You can add multiple files at a time after clicking Choose Files. Select the check box next to the attachment to attach to the current line. Any attachment added will display in the list of available attachments for other lines, but will be initially unchecked. Deleting an attachment will remove the attachment from all lines.
The Save button will save the changes to the attachment screen and return the user to the Expense Report Edit screen. The Cancel button will also navigate the user to the Expense Report Edit screen but without saving any changes. You can click on the attachment name to view the attachment.
Who can view Attachments
Other than users having permission to edit an expense report, users such as Administrators, Managers, Project Approvers and Customers may also be able to view expense report/request attachments by clicking on the paper clip icon located on the preview version of the expense report.
Note that whether the list of attachments are available for viewing by users having the customer role is controlled via the Allow Customers to View Expense Report Attachments (unasense.customer.view_attachments) property.
This section will only appear if attachments exist.
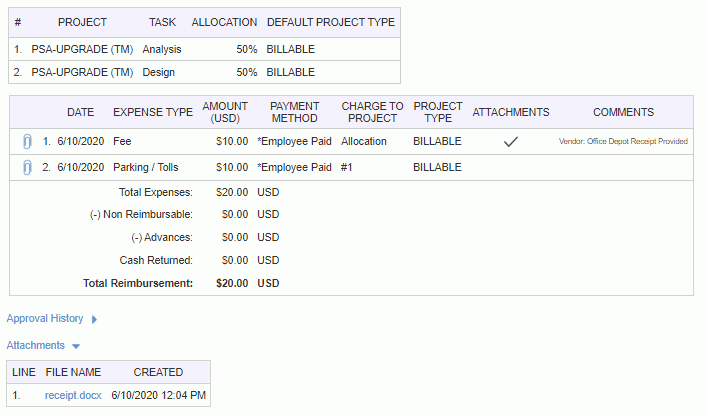
If the attachment is associated with lines, it will be listed with each line number in the Attachments section. Document level attachments will be listed as well but will not have a line number.
Finally, note that the various Expense Lists will contain an icon to indicate attachments exist on a particular expense report (and will resemble the following):

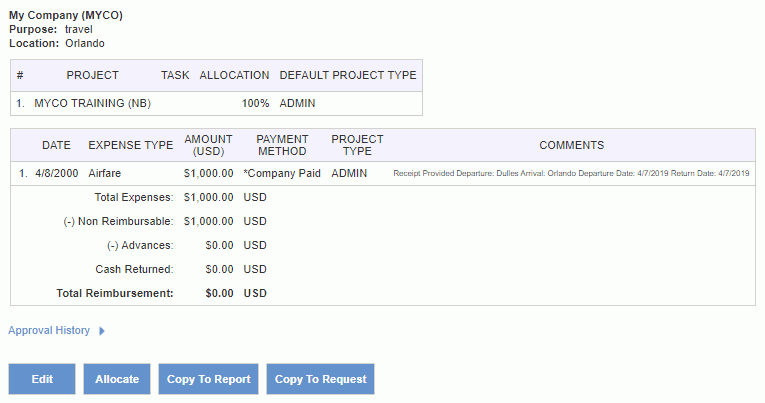
The ability to copy existing expense reports (or 'in progress' expense request) can be enabled via the Allow Expense Reports and Requests to be Copied (unasense.enable_copy) property. When enabled, a new set of copy buttons will appear on the preview version of the expense reports (and 'in progress' expense requests).
Users that have permission to add or edit an expense report on someone's behalf can create new expense reports (or requests) for that person by copying one of that user's existing expense reports/requests. Note, new expense reports/requests created using the copy feature will still belong to the originator of the expense being copied. You cannot copy another user’s expense reports/requests as your own. You can only create your own new expense reports/requests by copying from your own reports/requests.
When the feature property is disabled, the copy buttons will not appear.
This feature may be useful in cases where your users may submit an expense report on a periodic basis containing the same basic items, and may find it easier to copy an existing expense report to serve as a template for the new expense report.
If your site has been configured to suppress the display of the "Add Expense Report" or "Add Expense Request" links (via menu.xml overrides), the corresponding copy expense report or copy expense request buttons will also be hidden.
The new buttons will appear below the expense report / request as follows:
Copy Rules
Until an expense report reaches the LOCKED or EXTRACTED status, it can be edited (thus returning the status to INUSE), in which case it can be deleted via the user interface (using the delete icon on the Expense List).
Once an expense report reaches the LOCKED or EXTRACTED status, it may be able to be removed via the Expense Import. This feature is an Administrative only feature and was intended primarily to address issues during initial historical data loading. You can also void expense reports even after a financial post (see People List -> Voiding Expense Reports). You might also be interested in Quick Topic - How do I correct, negate, or delete an expense amount? (search for this topic in the Knowledge Center).
Note that you cannot delete an expense report via the Expense Import if any of the line items have been included in the Expense Report Cost Post or the Billing & Revenue Post or a vendor invoice has been created from the expense report via the Create Vendor Invoice from Expense Report process or Create Vendor Invoice from Matched Transactions process.
Users can record expense reports and expense requests to projects and tasks outside of their legal entity (see Multi-Entity) if they are assigned as a loaned intercompany resource (see new assignments page Intercompany Support). These users may record expenses against projects and tasks that are outside of their organization if the organizations have an intercompany association defined between them (see Setup Multi-Entity Associations) and the user has an intercompany assignment to the project.
Managers in the project approval group can approve expenses charged by the intercompany employees.