|
|
|
|
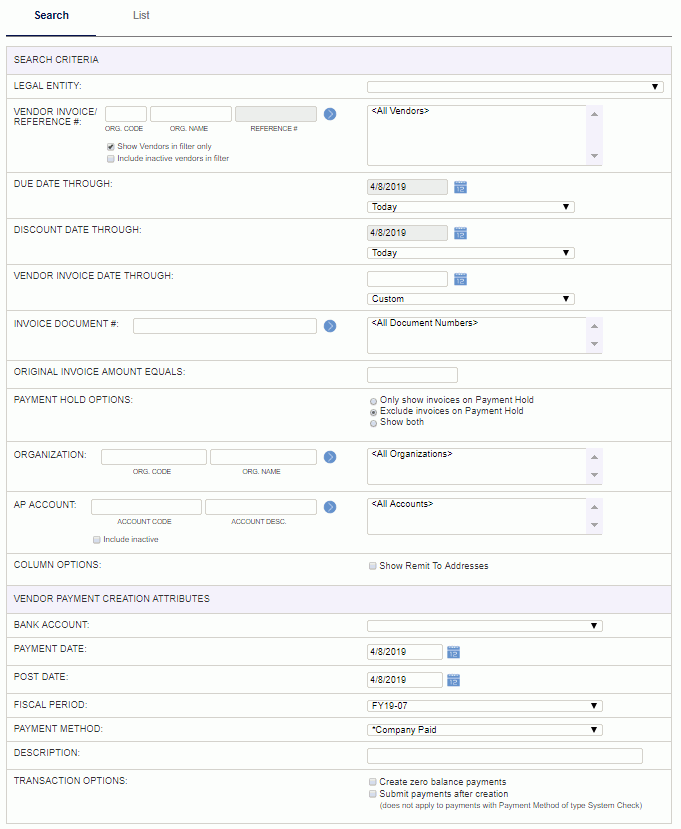
Bulk Vendor Payment Creation is used to create Vendor Payments for previously entered unpaid vendor invoices and unapplied payments. This task will typically be the first step in the Check Generation process. On this screen, you will supply both Search Criteria (to identify the Legal Entity, Vendor of interest, and other filtering options), as well as supply Creation Attributes that will be needed during the Vendor Payment creation process (i.e. Bank Account, Payment Date, Payment Method, etc.).
In addition to vendor invoices or overapplied vendor payments that match the search criteria, the resulting list may also include all posted vendor invoices having a negative balance and any unapplied vendor payments for vendors whose vendor invoices have been selected. These negative balances can be used to reduce the payment amount of the vendor payment. Should the total selected payment amount for a vendor be below zero, the amount applied should be limited to the amount necessary to take the total vendor payment down to zero.
Once the List has been refined and specific items selected for inclusion, clicking the Create Payments button will initiate the process. This process will create one or more payment documents for the specified vendors. These payment documents will then be available for edit or to include in a check run via the Vendor Payments screen.
This screen is available to users having any of the following roles: Administrator, AP User or AP Poster.
This screen is available with the Project Financials family of Unanet licenses.
Topics covered on this help page include:
Search (to refine the list of items to be included and provide creation attributes)
List (to select which items will be included)
Create Payments Process (to generate Vendor Payments)
You may also be interested in:
Using the Search screen, you will supply both search criteria and required attributes that will be needed during the Vendor Payment creation process.
Search Criteria
Legal Entity must be specified, otherwise, all other Search Criteria is optional.
Legal Entity and Vendor search criteria apply to filtering Vendor Invoices and Vendor Payments, all other search criteria applies only to Vendor Invoices
When changing the Legal Entity:
Vendor Payment Creation Attributes
The fields in this section are required (i.e. Bank Account, Payment Date, Post Date, Fiscal Period and Payment Method).
When changing the Bank Account:
|
|
|
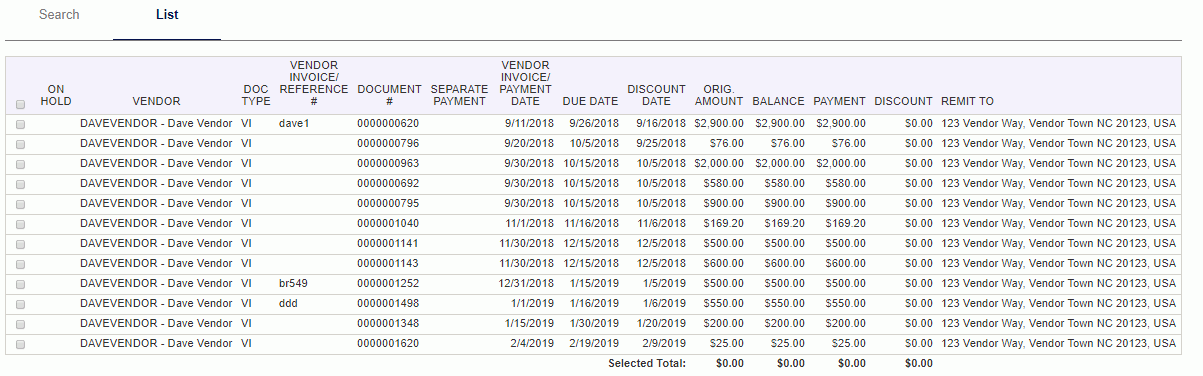
From the list of available entries, you can check one or many of the entries to include in the Vendor Payment creation process. Clicking on the Check All option at the top will toggle the checkboxes on each row on and off. Note that those items marked as On Hold, must be manually checked and unchecked independent of the Check All functionality.
Should the total of the selected payments for a vendor be below zero, the amount applied will be limited to the amount necessary to take the total vendor payment down to zero (but not below). The order in which amounts are applied is discussed further in the Create Payment Process section below. In such cases, this will only happen if the Create Zero Balance Payments checkbox is checked, otherwise a warning message will indicate the total payment amount is below zero.
The entries displayed in the resulting List screen will meet the following criteria:
After selecting the desired entries, you can click on the Create Payments button to initiate the Create Payment Process.
|
|
|
Once items have been selected on the List screen, the process can be initiated by clicking on the Create Payments button.
Each newly generated Vendor Payment will contain Summary information as supplied on the Search screen, including:
The newly generated Vendor Payments will be left in the INUSE status, available for further editing, summitting or posting.
Validations
A warning message will be displayed if a Payment Method having a Type of "System Check" is selected, when the vendor has no default Remit To address defined on their Organization >> Address screen.
Process Description
Process Feedback
As the Vendor Payments are created, details of each document created will be displayed along with the start and end date / time stamp for the overall process.

Upon completion of the process, you will have two navigation choices via the available buttons:
![]()